WaviBot AI Chatbot CRM – User Guide
Welcome!
Thank you for choosing WaviBot AI Chatbot
CRM for your WordPress site! This powerful plugin allows you to deploy “Wavi,” an intelligent
AI chatbot, to engage visitors 24/7, provide instant support based on your custom knowledge, capture leads
directly into a built-in CRM within WordPress, and offer a modern interactive experience with multilingual
and voice capabilities.
This guide will walk you through everything you need to know
as a site administrator, from installation and crucial first steps to configuring all the powerful features
WaviBot offers to enhance your website.
1. Introduction & Key Benefits
WaviBot AI Chatbot CRM is more than just a chat widget; it’s
an integrated solution leveraging OpenAI’s powerful AI to transform your website’s interaction capabilities.
Here’s how it benefits you:
- 🚀 Boost Engagement & Conversions: Interact instantly when visitors are most
interested. Guide them through your site, answer questions based on your data, and capture
leads before they leave using the WaviBot interface. - ⚙️ Reduce Support Load: Automate answers to frequently asked questions 24/7 using a
knowledge base you control, freeing up your human support team for complex issues. - 📊 Capture & Manage Leads Easily: Automatically save visitor contact info directly
into a built-in CRM within your WordPress dashboard – no extra CRM plugin needed for essential lead
capture and management! - ✨ Enhance User Experience: Offer a modern, cutting-edge experience with natural
language understanding, optional voice interactions (input and output), and multilingual support. - 🌍 Reach a Global Audience: Communicate effectively with visitors in their preferred
language. - 📈 Improve Over Time: The optional Continuous Learning Engine allows WaviBot to get
smarter based on real user feedback. - 🎨 Maintain Brand Consistency: Fully customize the chatbot’s appearance to match your
website’s design. - 🔒 Centralized & Secure: Manage everything (AI settings, leads, chats, training,
analytics) within your familiar WordPress admin area, built with security best practices.
2. Critical Requirements (Read First!)
Important: Failure to meet these
requirements, especially License Activation and OpenAI setup, will prevent WaviBot from functioning
correctly.
Before installing and configuring WaviBot, please ensure you
meet these essential requirements:
- ✅ WordPress Website: Version 5.0 or higher.
- ✅ PHP Version: 7.4 or higher is strongly recommended for optimal performance and
compatibility. - ✅ Envato Purchase Code: You received this unique code when you purchased WaviBot AI
Chatbot CRM. Activation using this code is MANDATORY for the plugin to function. - ✅ OpenAI Account & API Key: You MUST have your own account with
OpenAI (OpenAI.com) and generate an API
Key. WaviBot requires this key for all its AI capabilities. - ✅ Understanding of OpenAI Costs: VERY IMPORTANT! While
WaviBot offers powerful AI features, using OpenAI’s API (for chat responses via models like GPT-4o mini,
for vector search embeddings, and for premium Text-to-Speech options like TTS-1/GPT-4o mini TTS)
incurs costs based on your usage. These costs are billed directly by
OpenAI to your account, separate from the plugin purchase price. Please carefully review
OpenAI’s current pricing structure. (Note: Using only the Browser-based TTS/STT options included does
not incur OpenAI costs). - ✅ Server Configuration:
- Your WordPress uploads directory (
/wp-content/uploads/) must be
writable by your web server so WaviBot can store training data files. - If you plan to use the Vector Search feature, ensure WP-Cron
is enabled and running reliably on your site, or configure a server-side cron job for better
performance, as it’s used for background indexing. - Required PHP extensions:
json,mbstring,curl(or
allow_url_fopenenabled).
- Your WordPress uploads directory (
3. Installation
Follow these steps to install WaviBot AI Chatbot CRM:
- Download: Obtain the plugin
.zipfile (e.g.,
wavibot-ai-chatbot-crm.zip) from your Envato Market downloads page. - Login: Log in to your WordPress Admin Dashboard.
- Navigate: Go to Plugins → Add New.
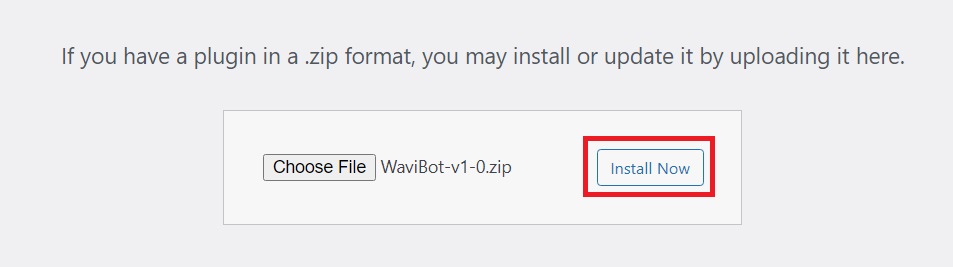
- Upload: Click the Upload Plugin button at the top.
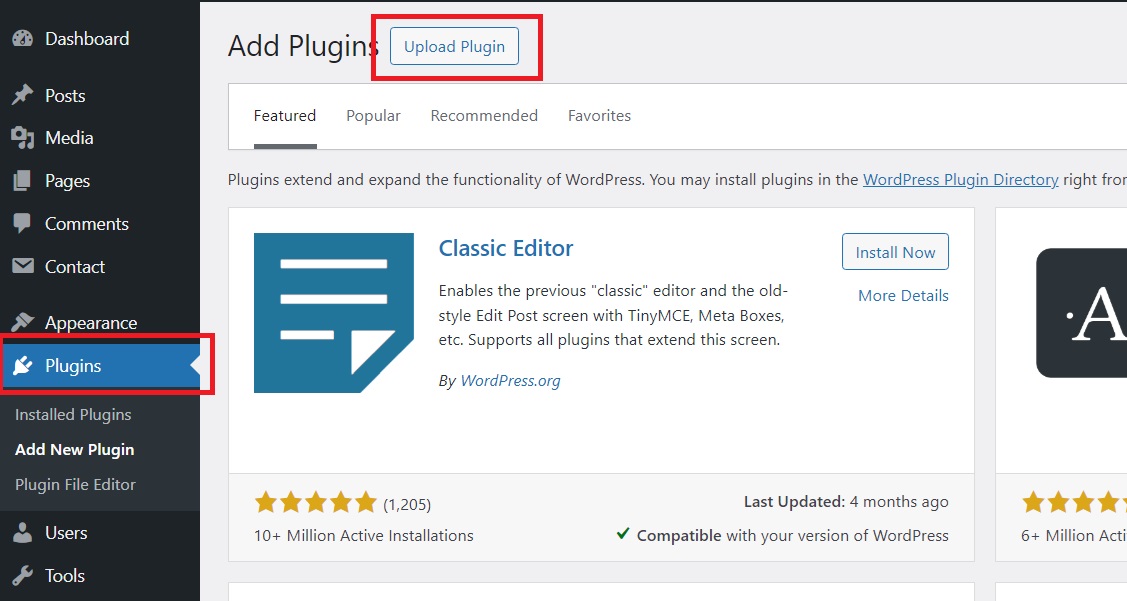
- Choose File: Click Choose File and select the
.zipfile
you downloaded in Step 1. - Install: Click Install Now.
- Activate: After successful installation, click the Activate Plugin
button.
WaviBot is now installed! Proceed immediately to License
Activation.
4. License Activation (Mandatory First Step!)
Activation Required: Activating your license is essential.
WaviBot AI Chatbot CRM will not function until you complete this step.
- After activating the plugin, navigate to Settings → AI Chatbot CRM in
your WordPress admin menu.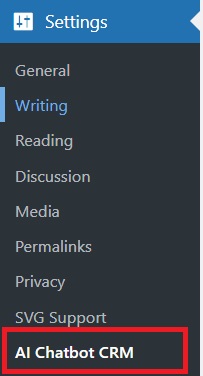
- You will likely be directed to the License tab automatically, or click on it if not.
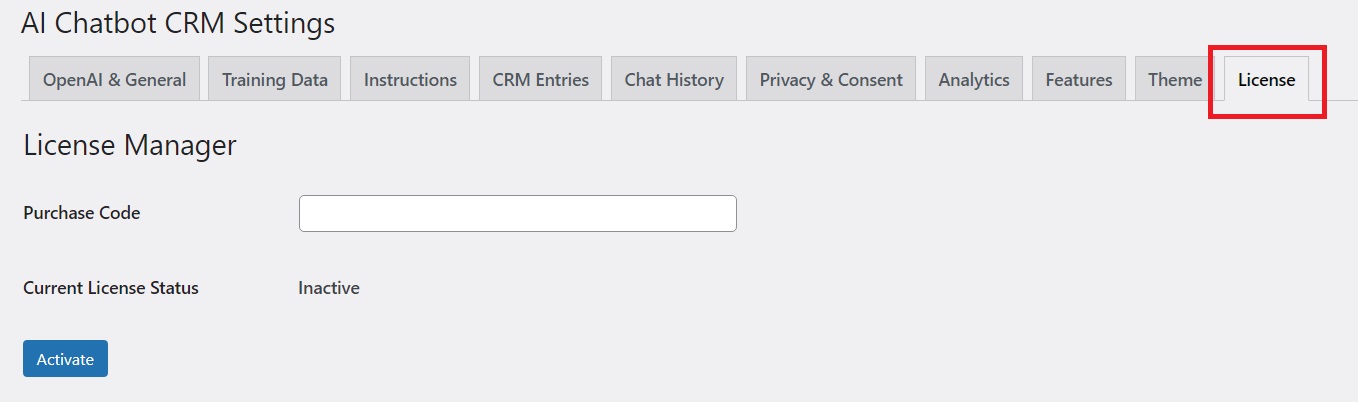
- Find the field labeled Purchase Code.
- Carefully enter the Envato Purchase Code you received when you bought the plugin.
- Click the Activate button.
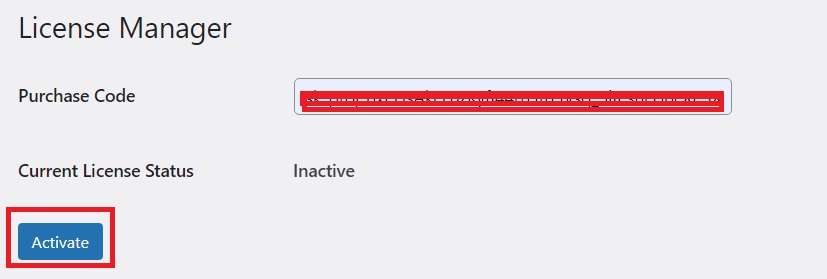
- The plugin will securely contact the Wavi One license server (
license.newwaves.app) to
verify your purchase against your website’s domain. - Upon successful verification, the Current License Status should update to display
Active.
- If activation fails:
- Double-check that you entered the Purchase Code correctly (copy and paste is best).
- Ensure your website server can make outbound HTTPS connections (specifically to
license.newwaves.app). Check with your hosting provider if unsure. - Contact plugin support via the method specified on the Envato item page if you continue to have
issues.
Once your license is active, you can proceed to
configure the OpenAI API Key.
5. Initial Setup: OpenAI API Key
To enable WaviBot’s AI features, you need to connect it to
your OpenAI account.
- Navigate to Settings → AI Chatbot CRM.
- Click on the OpenAI & General tab.
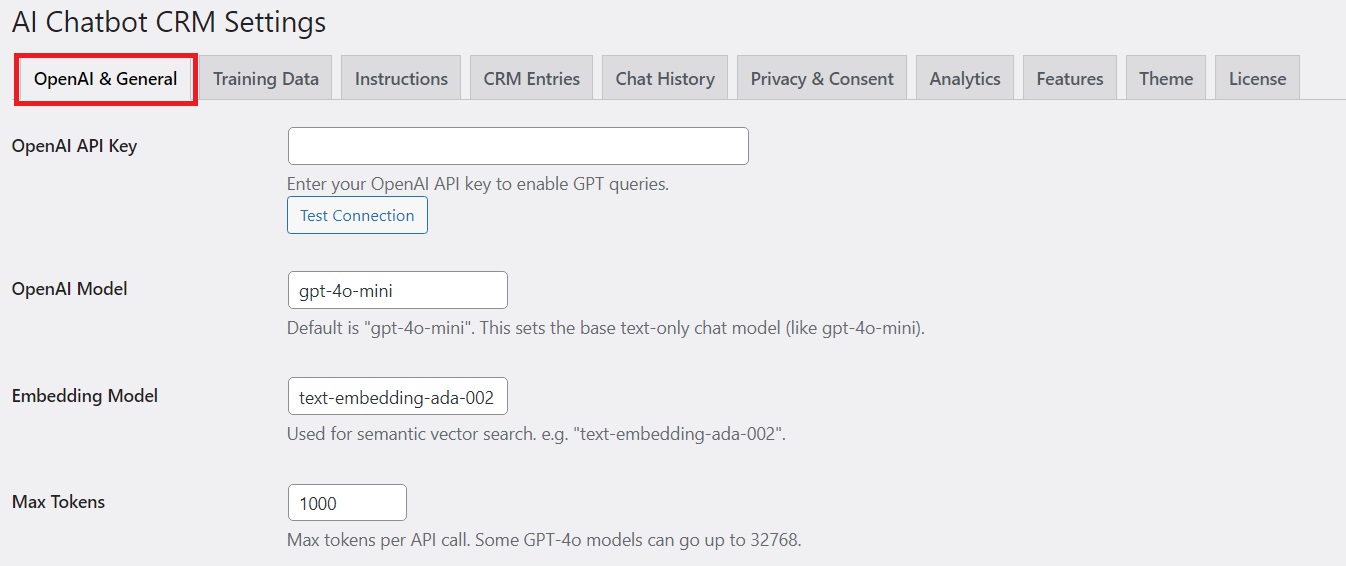
- Locate/Generate your OpenAI API Key:
- Visit OpenAI.com and log in to
your account. - Go to the API keys management section (usually found under your account profile or developer
settings). - Create a New Secret Key. Give it a recognizable name (e.g., “WaviBot Key for
[YourSite]”). - Important: Copy the generated key immediately and store it securely. OpenAI
will not show you the full key again after this initial creation.
- Visit OpenAI.com and log in to
- Enter the Key in WaviBot: Paste the copied Secret Key into the OpenAI API
Key field within the plugin settings.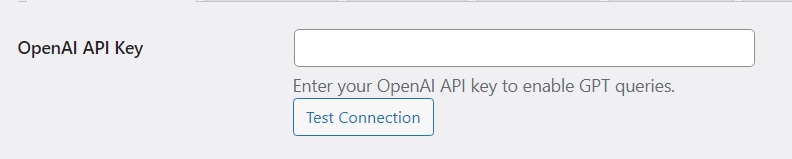
- Verify the Key: Click the Test Connection button located just below
the API Key field.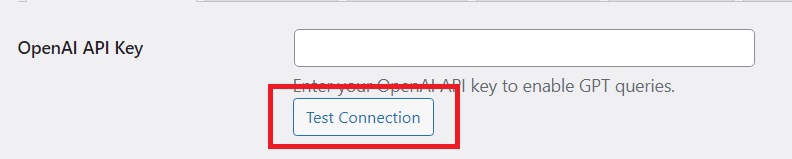
- WaviBot will attempt to communicate with OpenAI using your key.
- A success message (“Connection successful…”) confirms the
key is valid and working. - An error message indicates a problem. Check:
- Did you paste the key correctly?
- Is the key still active in your OpenAI account?
- Have you set up billing information in your OpenAI account? (Required for API usage
beyond any initial free credits).

- Save Settings: Scroll down and click the Save Changes button.
OpenAI Costs Reminder: Your WaviBot is now connected
to OpenAI! Be mindful that interactions using OpenAI models will now consume credits/funds from your
OpenAI account based on their pricing.
6. Admin Settings Explained (Tab by Tab)
Let’s explore the configuration options available under
Settings → AI Chatbot CRM:
License Tab
(Covered in Section 4) Used solely for activating or
deactivating your plugin license.
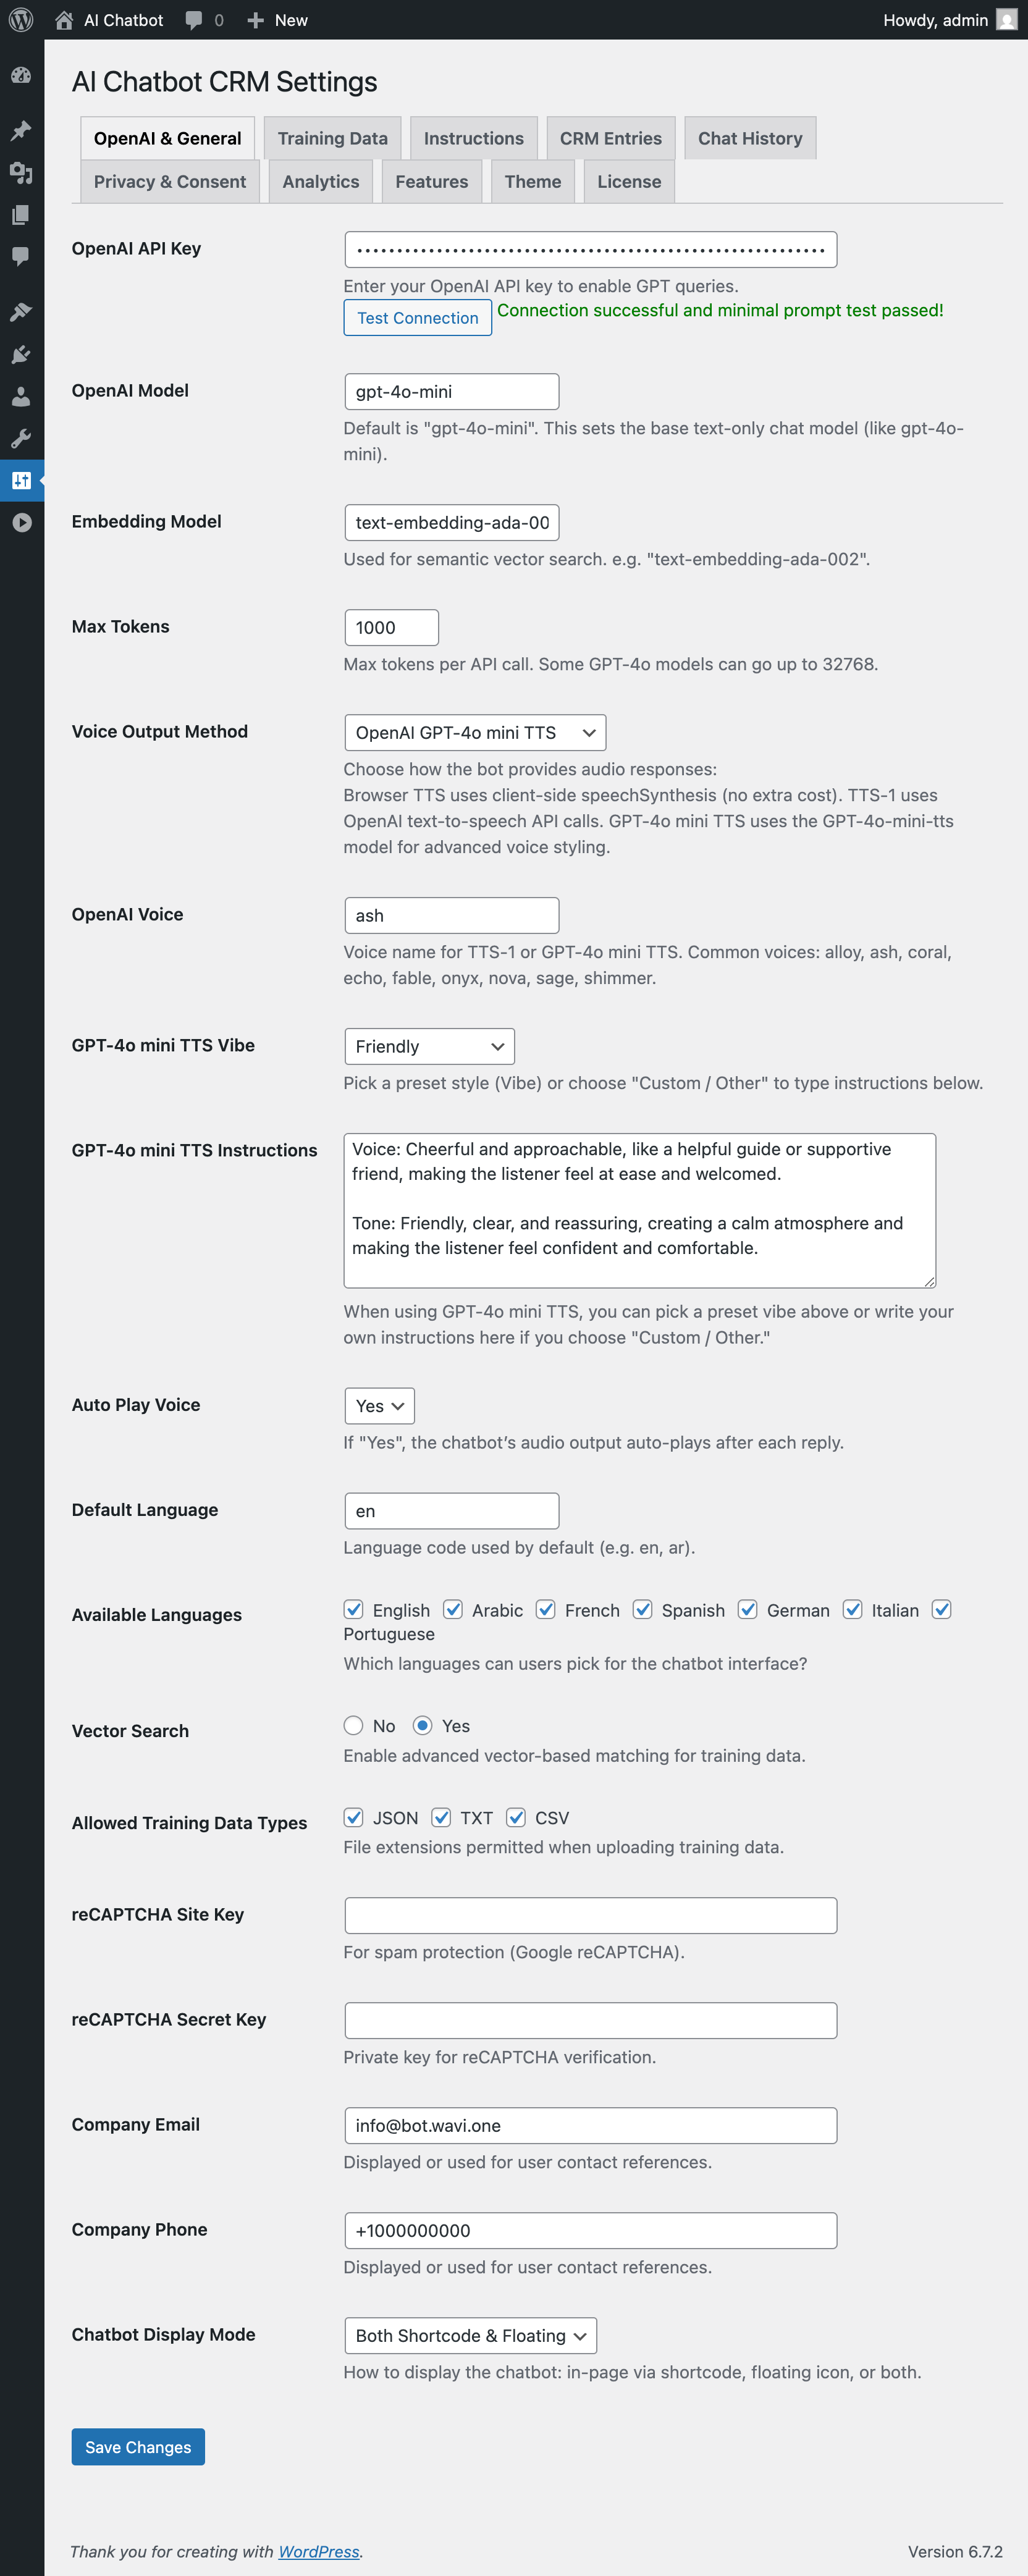
OpenAI & General Tab Requires Active License
OpenAI API Key/Test Connection: Your essential link to OpenAI. (See
Section 5).OpenAI Model: Select the primary AI model for generating chat responses (e.g.,
gpt-4o-mini). Different models offer varying levels of intelligence, speed, and cost.
gpt-4o-miniis often a good starting point.Embedding Model: Select the model used for the optional Vector Search feature (e.g.,
text-embedding-ada-002). Affects search quality and embedding costs.Max Tokens: Sets the maximum length (in tokens, roughly parts of words) for an AI
response. Higher values allow longer answers but increase cost and potentially response time.Voice Output Method: Choose how WaviBot generates audio:Browser: Free, uses the visitor’s device/browser voice. Quality varies.tts-1: Premium OpenAI voice generation. Higher quality, consistent voice.
Incurs OpenAI cost.gpt-4o-mini-tts: Advanced OpenAI voice generation with style control. Highest
quality and flexibility. Incurs OpenAI cost.
OpenAI Voice: If usingtts-1orgpt-4o-mini-tts, specify the
voice name (e.g.,alloy,nova,shimmer). Consult OpenAI
documentation for available voices.GPT-4o mini TTS Vibe: (Only if usinggpt-4o-mini-tts) Select a pre-defined
personality (e.g.,friendly,professional) or choose
Custom / Otherto use the detailed instructions below it.GPT-4o mini TTS Instructions: (Only if usinggpt-4o-mini-ttswith ‘Custom’
vibe) Provide detailed text instructions to shape the AI voice’s tone, emotion, pacing, etc.Auto Play Voice: If ‘Yes’, WaviBot will attempt to automatically play voice responses.
(Note: Browser autoplay policies might sometimes prevent this without prior user interaction).Default Language: Sets the initial language displayed in the chat interface (e.g.,
enfor English,arfor Arabic).Available Languages: Checkboxes allowing you to select which languages visitors can
choose from in the frontend dropdown menu.Vector Search: Enable (‘Yes’) for more accurate, context-aware answers based on
meaning, using OpenAI embeddings (requires API calls/cost for indexing and queries). Disable (‘No’)
for simpler content usage.Allowed Training Data Types: Select which file types (json,
txt,csv) are permitted for upload in the Training Data tab.reCAPTCHA Site Key/Secret Key: Enter your Google reCAPTCHA v2 keys here
if you want to add spam protection to the initial chat form. Leave blank to disable.Company Email/Company Phone: Your contact details, potentially used by
WaviBot in fallback responses when it cannot answer a query.Chatbot Display Mode: Choose how WaviBot appears on your site:shortcode
(embed manually),floating(corner button), orboth.
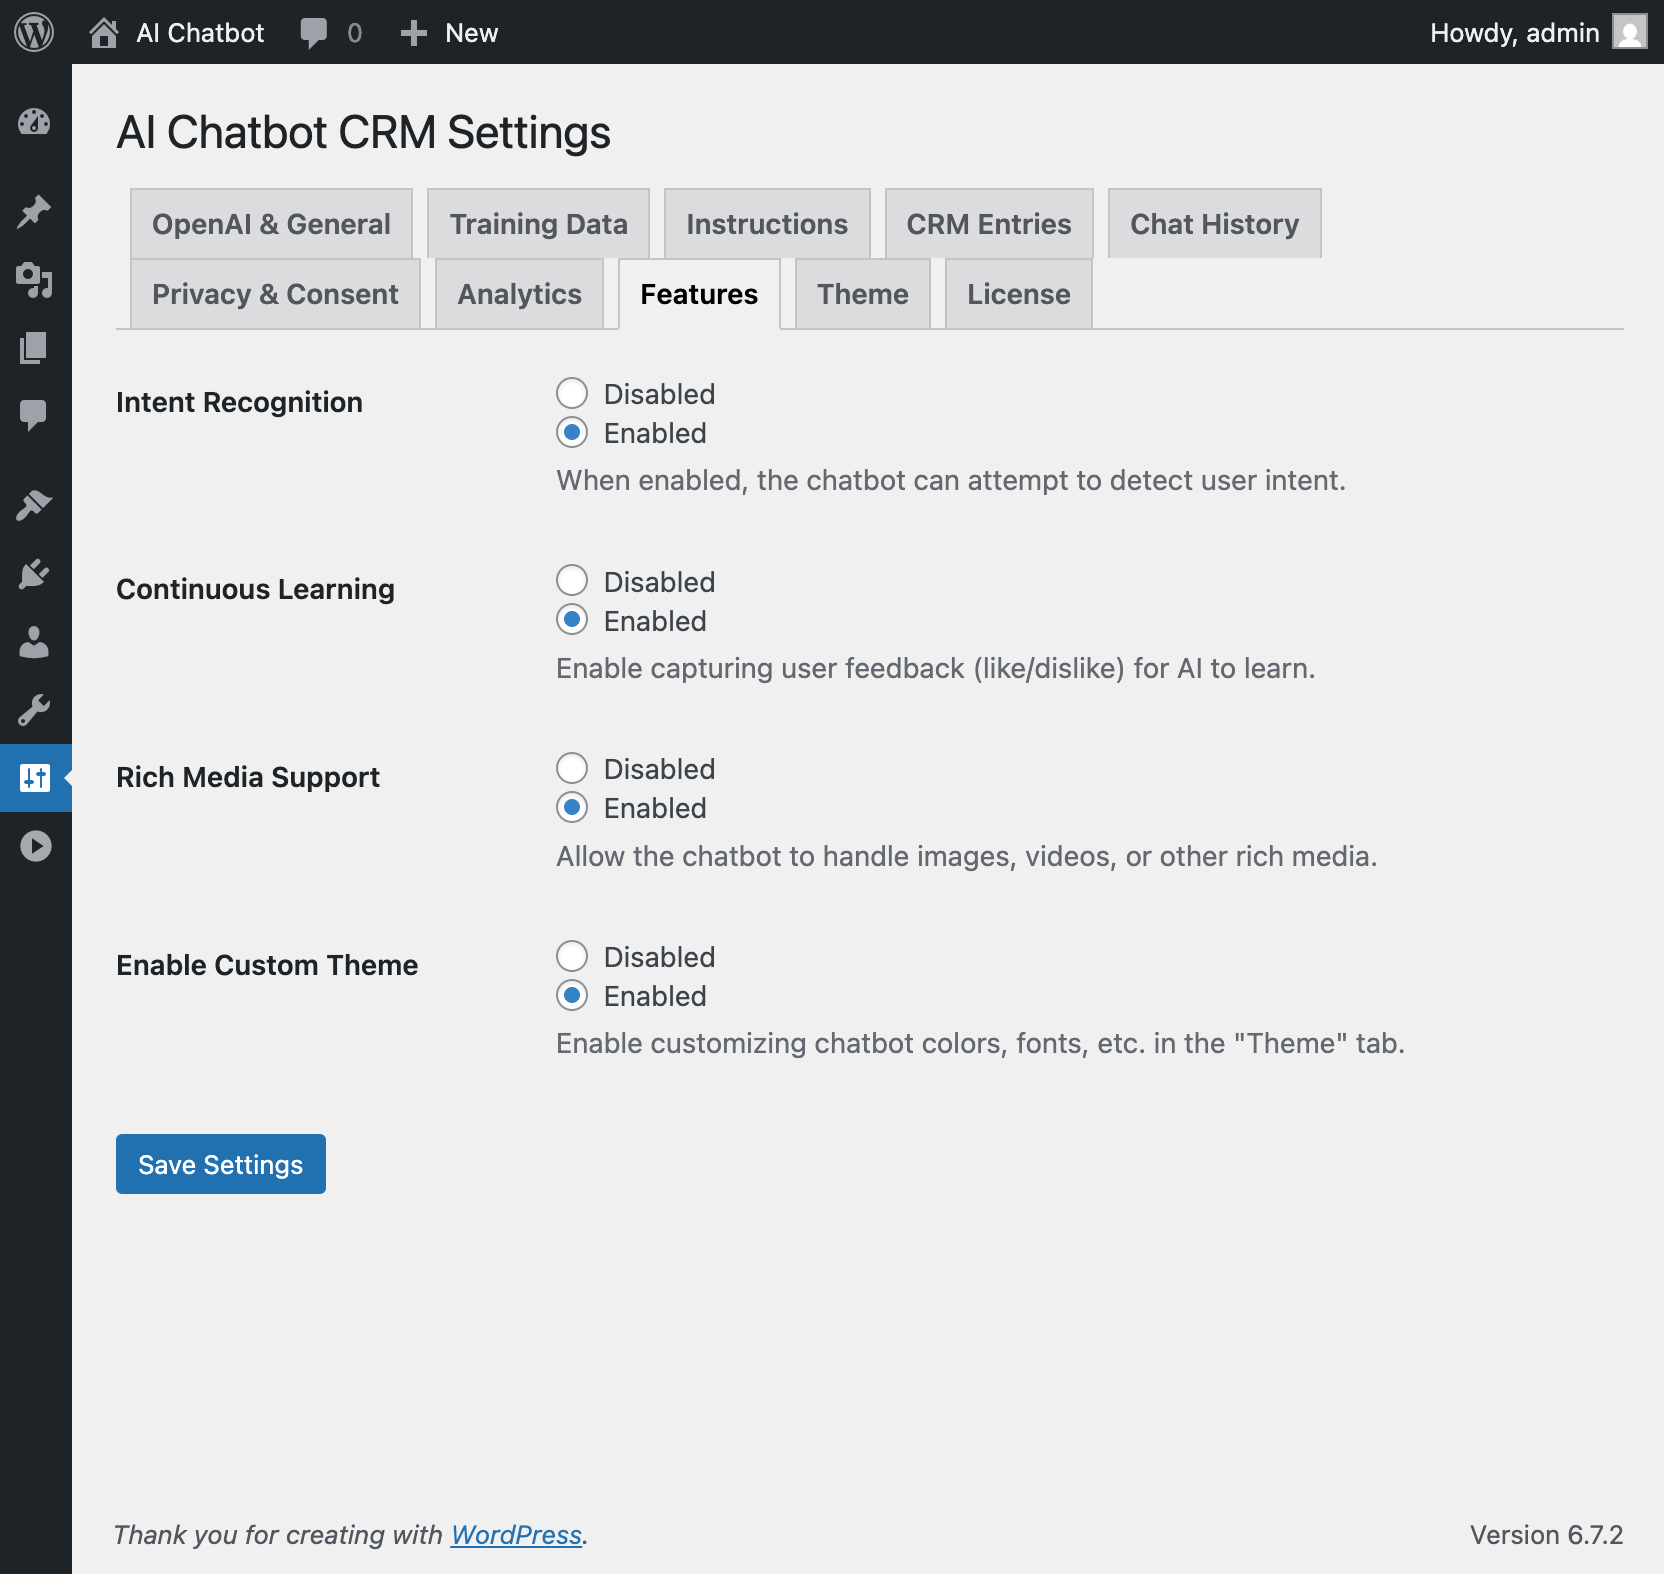
Features Tab Requires Active License
Intent Recognition: Enable/disable basic keyword spotting for specific scenarios (like
pricing/scheduling fallbacks defined in instructions).Continuous Learning: Recommended: Yes. Allows users to
rate WaviBot’s answers (👍/👎), enabling the AI to learn from feedback and improve accuracy over
time. CreatesCL_LIKEDandCL_DISLIKEDentries in the Training Data tab.Rich Media Support: Currently a placeholder for potential future features related to
images/videos in chat. Functionality may be limited.Enable Custom Theme: Set to ‘Yes’ to use the color and style settings defined
in the ‘Theme’ tab. If ‘No’, WaviBot uses its default appearance.
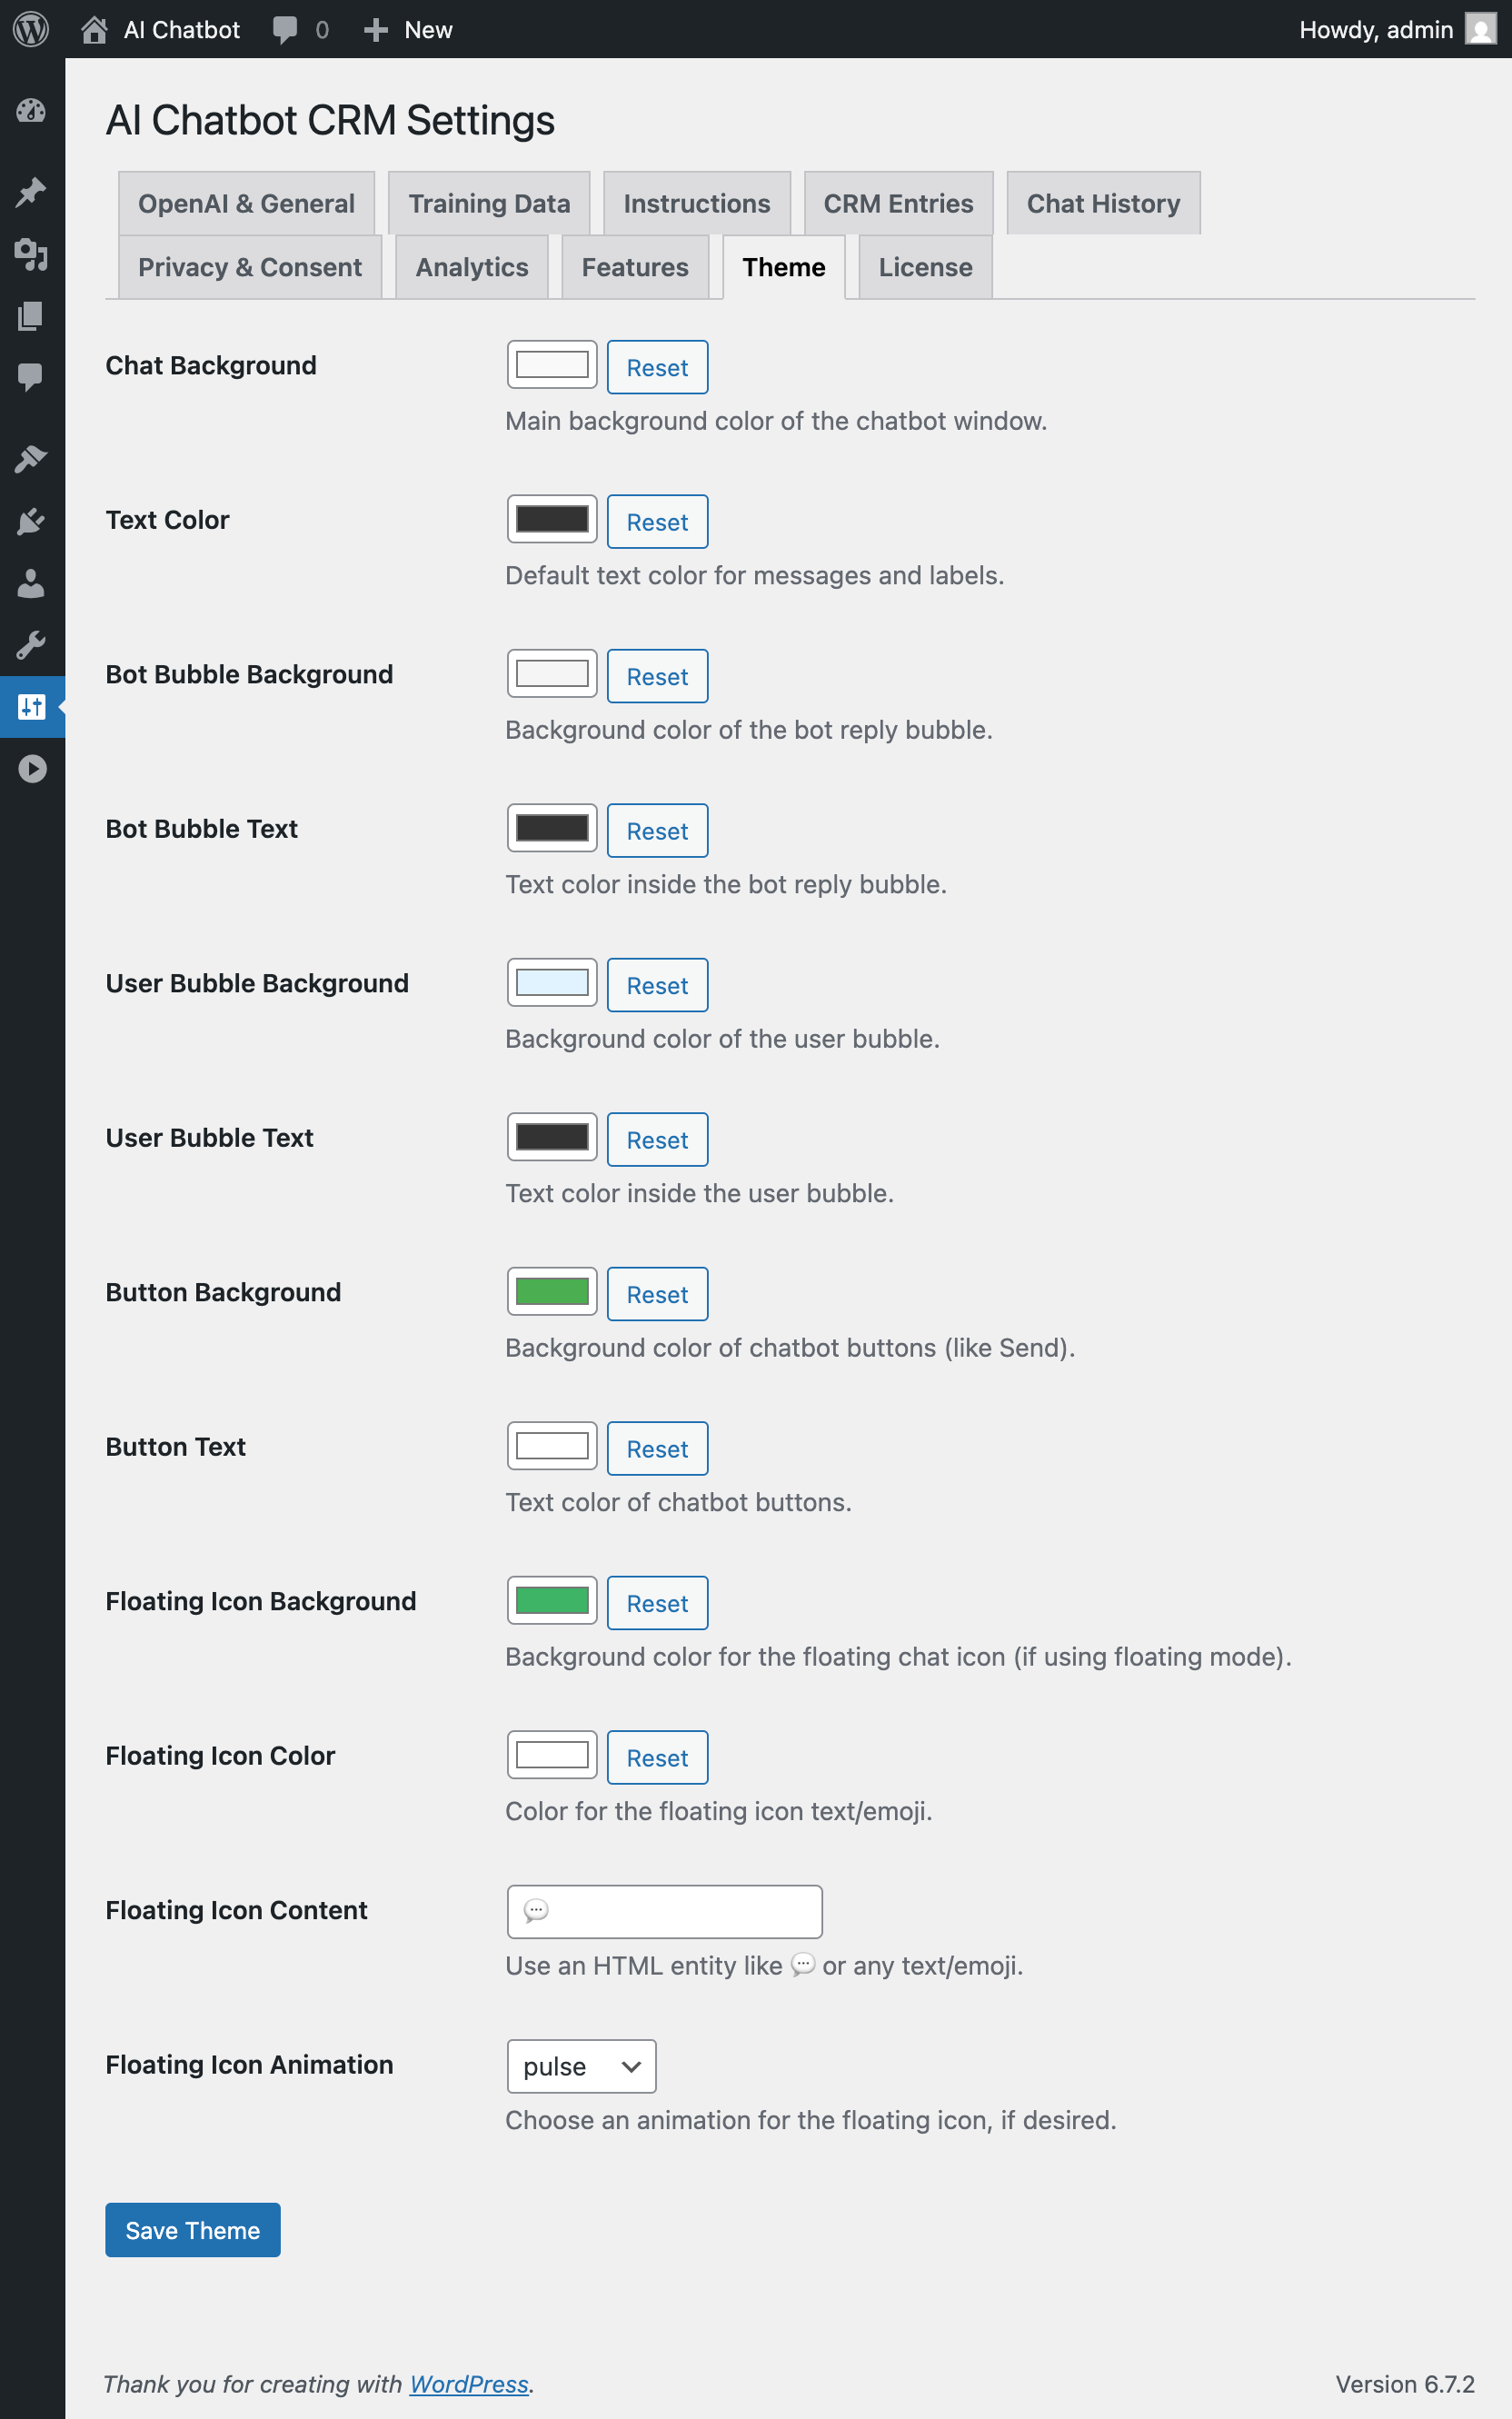
Theme Tab Requires Active License & ‘Enable Custom Theme’
- Use the color pickers to customize the appearance of the chat window (
Chat Background,
Text Color,Bot Bubble Background/Text,
User Bubble Background/Text,Button Background/Text) and the
Floating Icon Background/Color. - Use the text field for
Floating Icon Contentto set the emoji or text in the button
(e.g., 💬 or💬). - Use the dropdown for
Floating Icon Animationto add subtle effects (pulse,
bounce,spin) or set tonone. - Click
Resetnext to a color picker to revert to the default color. - Impact: Allows you to visually integrate WaviBot seamlessly with your website’s
design.
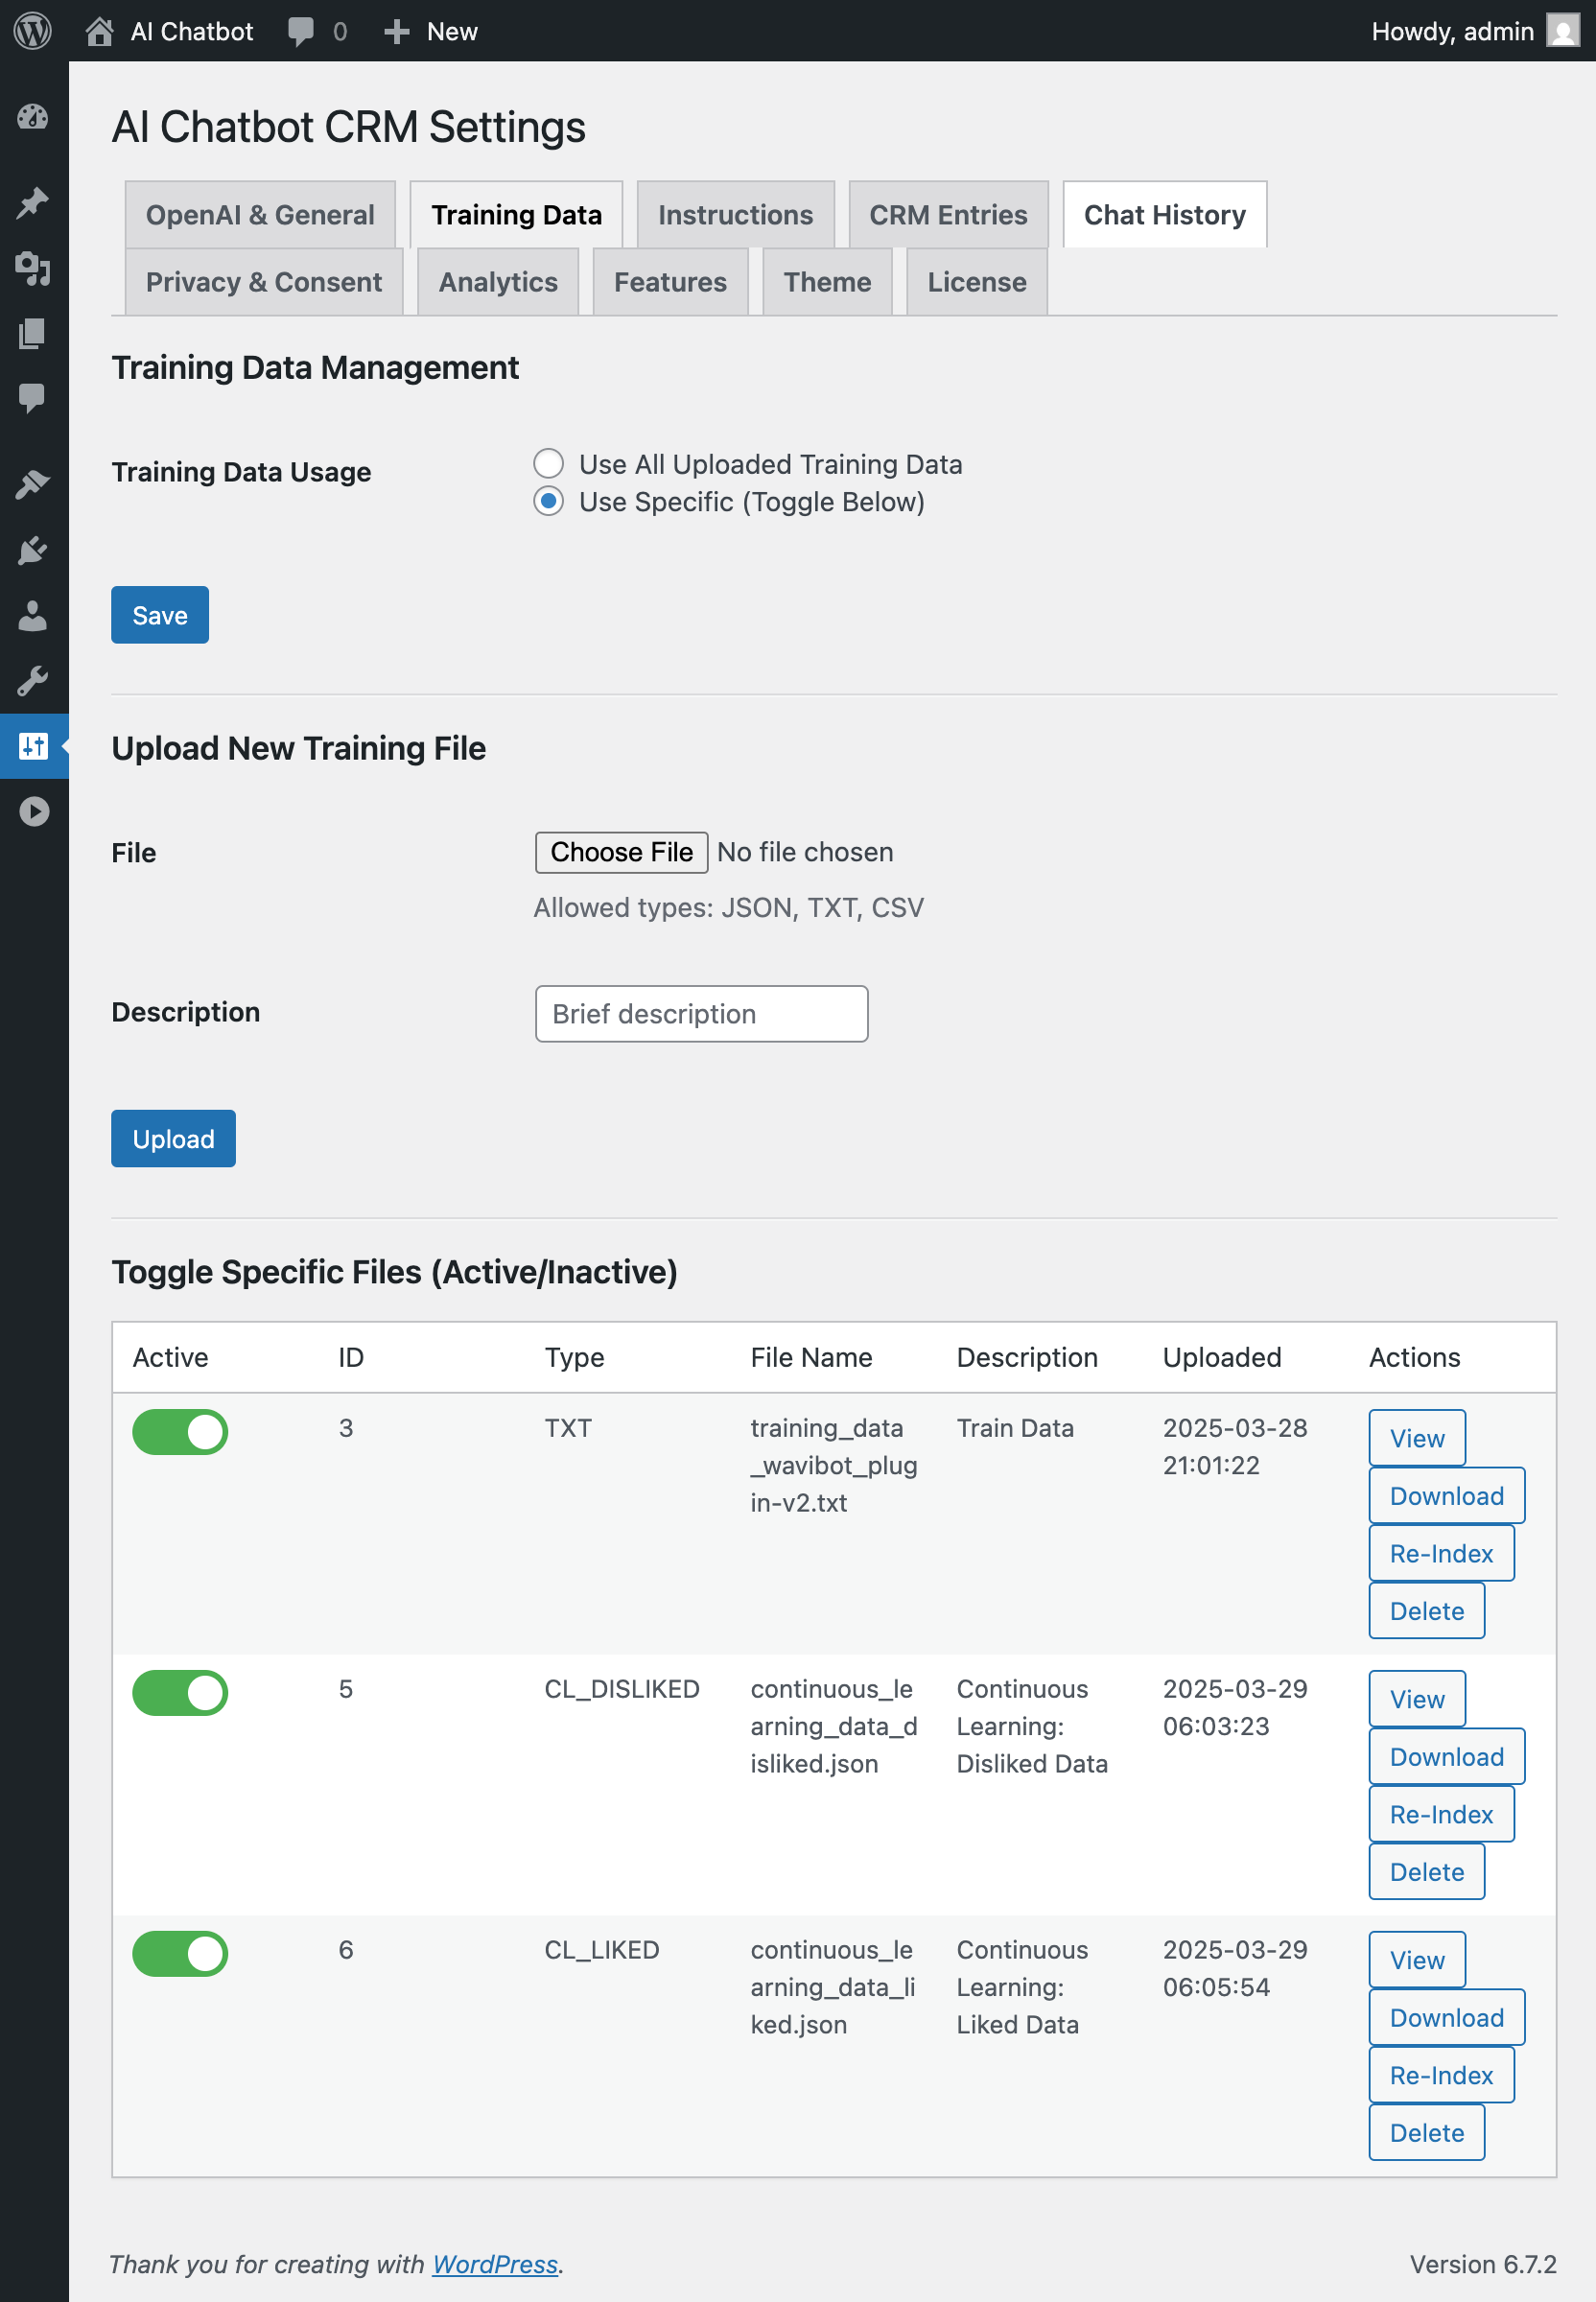
Training Data Tab Requires Active License
- Purpose: This is where you provide WaviBot with the specific knowledge it needs
about your business, products, services, or policies. Training Data Usage:Use All...: WaviBot will consider all uploaded files (of allowed types) plus
active Continuous Learning files.Use Specific...: WaviBot will only consider files you manually enable
using the ‘Active’ toggle switch in the table below.
- Upload Form:
- Click
Choose Fileto select a.txt,.json, or
.csvfile from your computer containing your information (e.g., FAQs formatted
as Q&A, product descriptions, policy text). - Add an optional
Descriptionfor your reference. - Click
Upload. The file is saved, and if Vector Search is enabled, background
indexing begins (may take a few minutes depending on file size and server/cron).
- Click
- Files Table: Lists uploaded files and Continuous Learning data.
ActiveToggle (Only if Usage=’specific’): Click the switch to enable/disable
specific files for AI use. Green is active.Actions:View: See a preview of the file’s content.Download: Save a copy of the original uploaded file.Re-Index: If Vector Search is ON, click this to force re-processing of
the file’s embeddings (useful after manual edits or if relevance seems off).Delete: Permanently removes the file, its database entry, and any
associated embeddings. Confirm carefully!
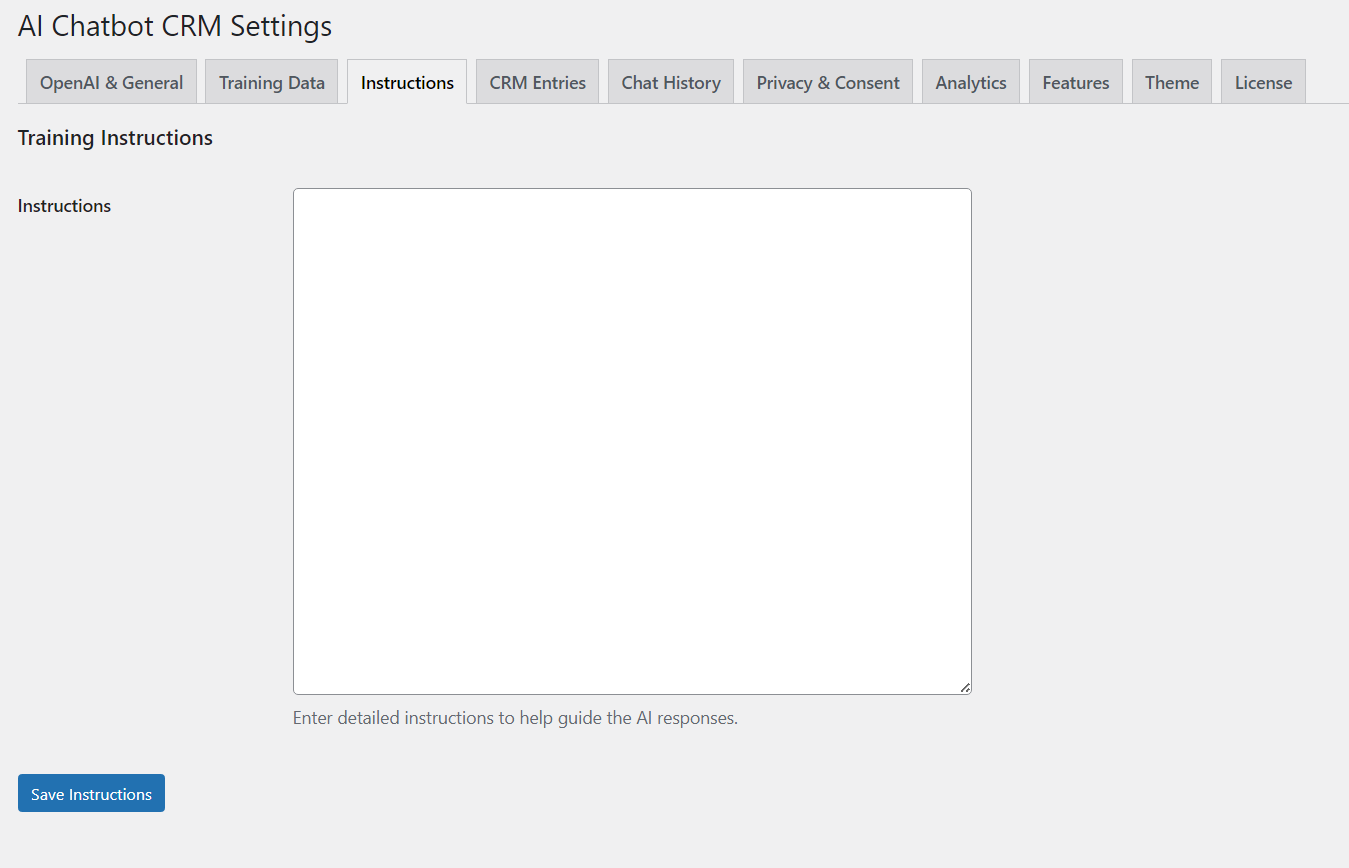
Instructions Tab Requires Active License
- Purpose: This large text area is critical for defining Wavi’s
personality, rules, boundaries, and how it should handle specific situations. While Training Data
provides knowledge, Instructions provide guidance. - Content: Paste the detailed, boundary-focused instructions provided in the “Final
Training Instructions” section (or adapt them carefully). Key elements include:- Defining the “Wavi” persona (helpful, professional, focused on WaviBot plugin).
- Setting the STRICT knowledge boundary (only training data).
- How to answer feature/setup/requirement questions (with benefits).
- How to handle Pricing questions (Value + Link to Envato ONLY).
- How to handle Support questions (Docs + Support Channel).
- How to politely refuse Off-Topic questions and pivot back.
- How to handle repetitive/persistent users.
- When/how to subtly guide towards demo/purchase.
- Impact: Directly shapes the AI’s responses, tone, and adherence to its role.
Well-written instructions are vital for good performance and controlled behavior.
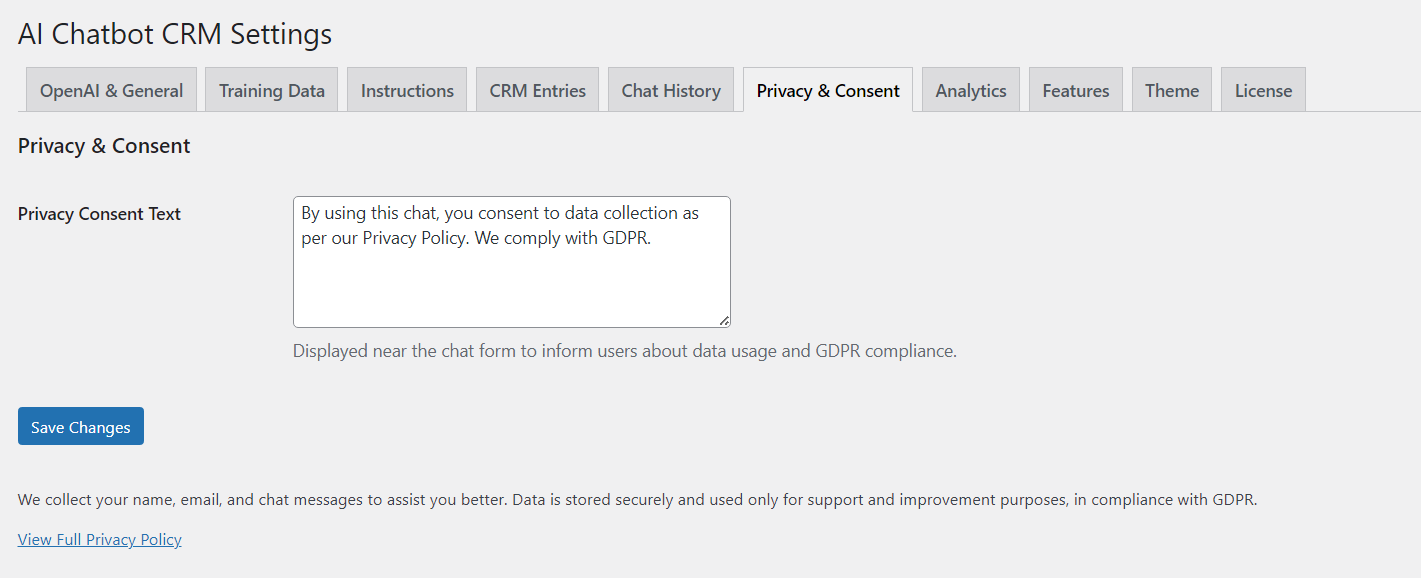
Privacy & Consent Tab
Privacy Consent Text: Edit the text displayed with the mandatory consent checkbox that
users must agree to before starting a chat. You can use basic HTML (like<a>tags
for links) to link to your site’s full privacy policy.
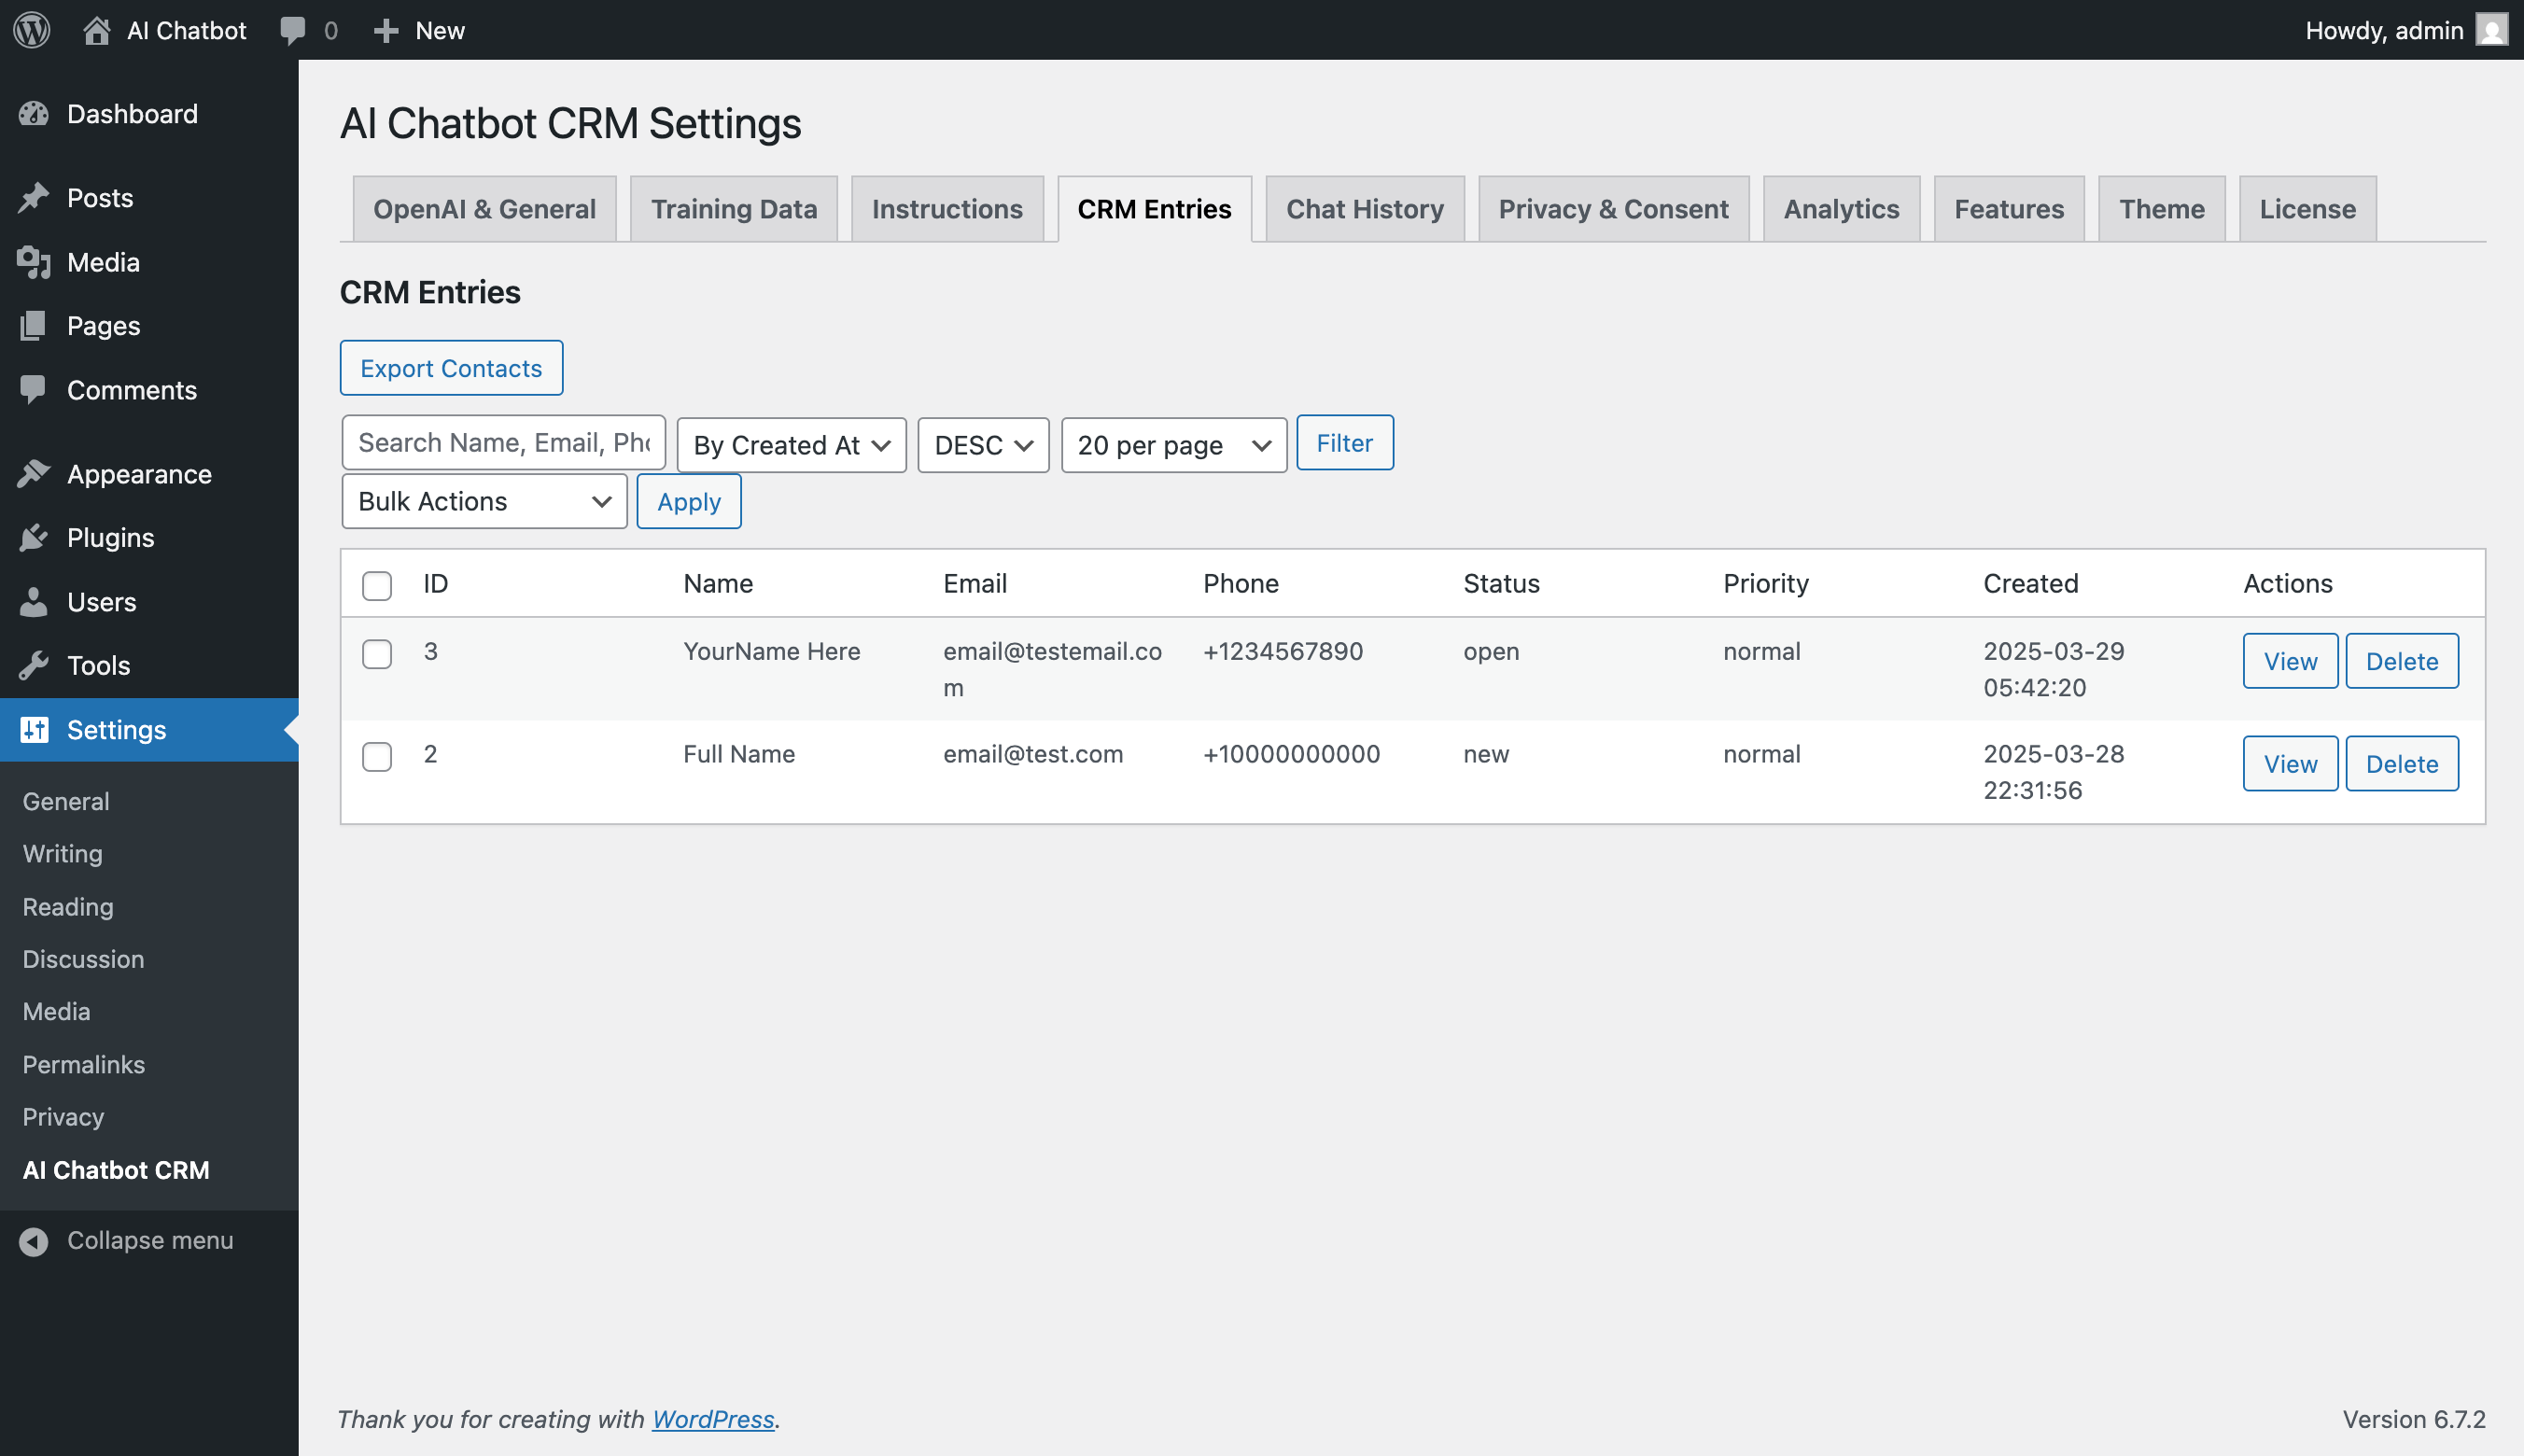
CRM Entries Tab
- Purpose: View and manage the leads captured by WaviBot.
Export Contacts: Click to download a CSV file of all entries.- Filters/Sorting: Use the controls at the top to find specific leads.
- Bulk Actions: Select multiple leads using checkboxes and apply actions like Delete,
Set Status, or Set Priority. - Table List: Shows key details of each lead. Click
Viewfor full
details. ClickDeleteto remove (confirms). - Single Entry View (
ViewAction):- Edit contact fields (Name, Email, Phone, Description).
- Manage
Lead Status,Source,Assigned To(assign to a
WP User),Priority. - View, Add, and Delete private
Notesfor internal tracking.
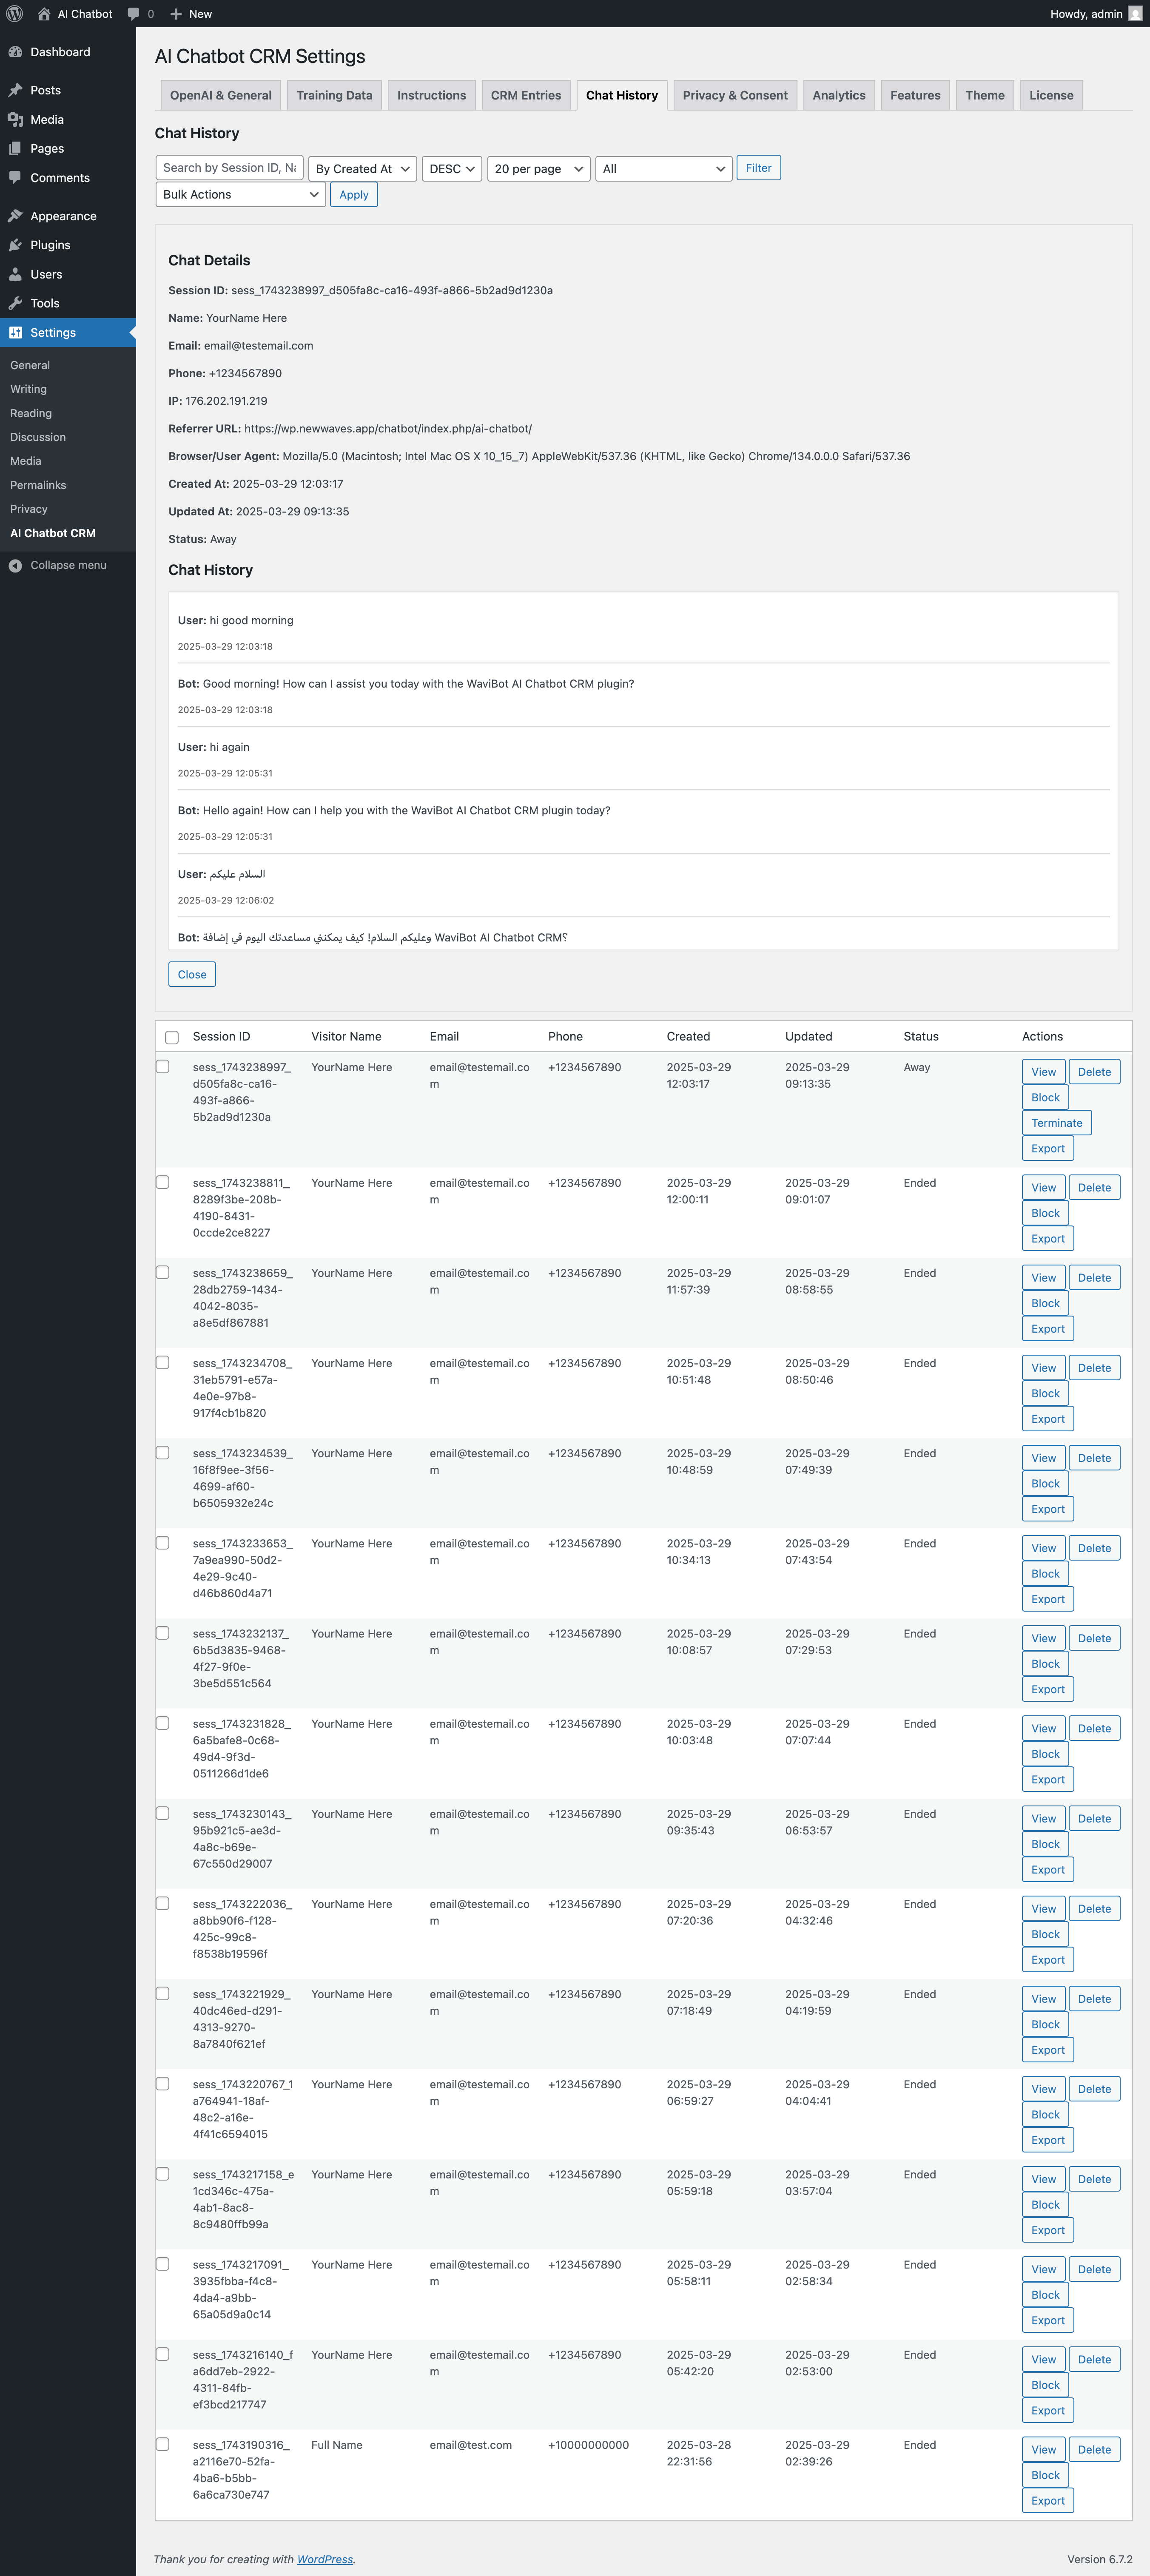
Chat History Tab
- Purpose: Review past conversations.
- Filters/Sorting: Find conversations by Session ID, Name, Email, Date, or Status
(Active, Blocked, Terminated, Ended). - Bulk Actions: Delete/Terminate multiple chats, Block/Unblock users (by IP), Export
selected chats to CSV. - Table List: Shows conversation summaries.
- Actions per conversation:
View: Expands inline to show the full message transcript.Delete: Permanently deletes the conversation (confirms).Block/Unblock: Blocks/unblocks the visitor’s IP address from using
the chat (confirms).Terminate: Manually stops an active chat (sets status to Terminated, confirms).Export: Downloads just that conversation as CSV.
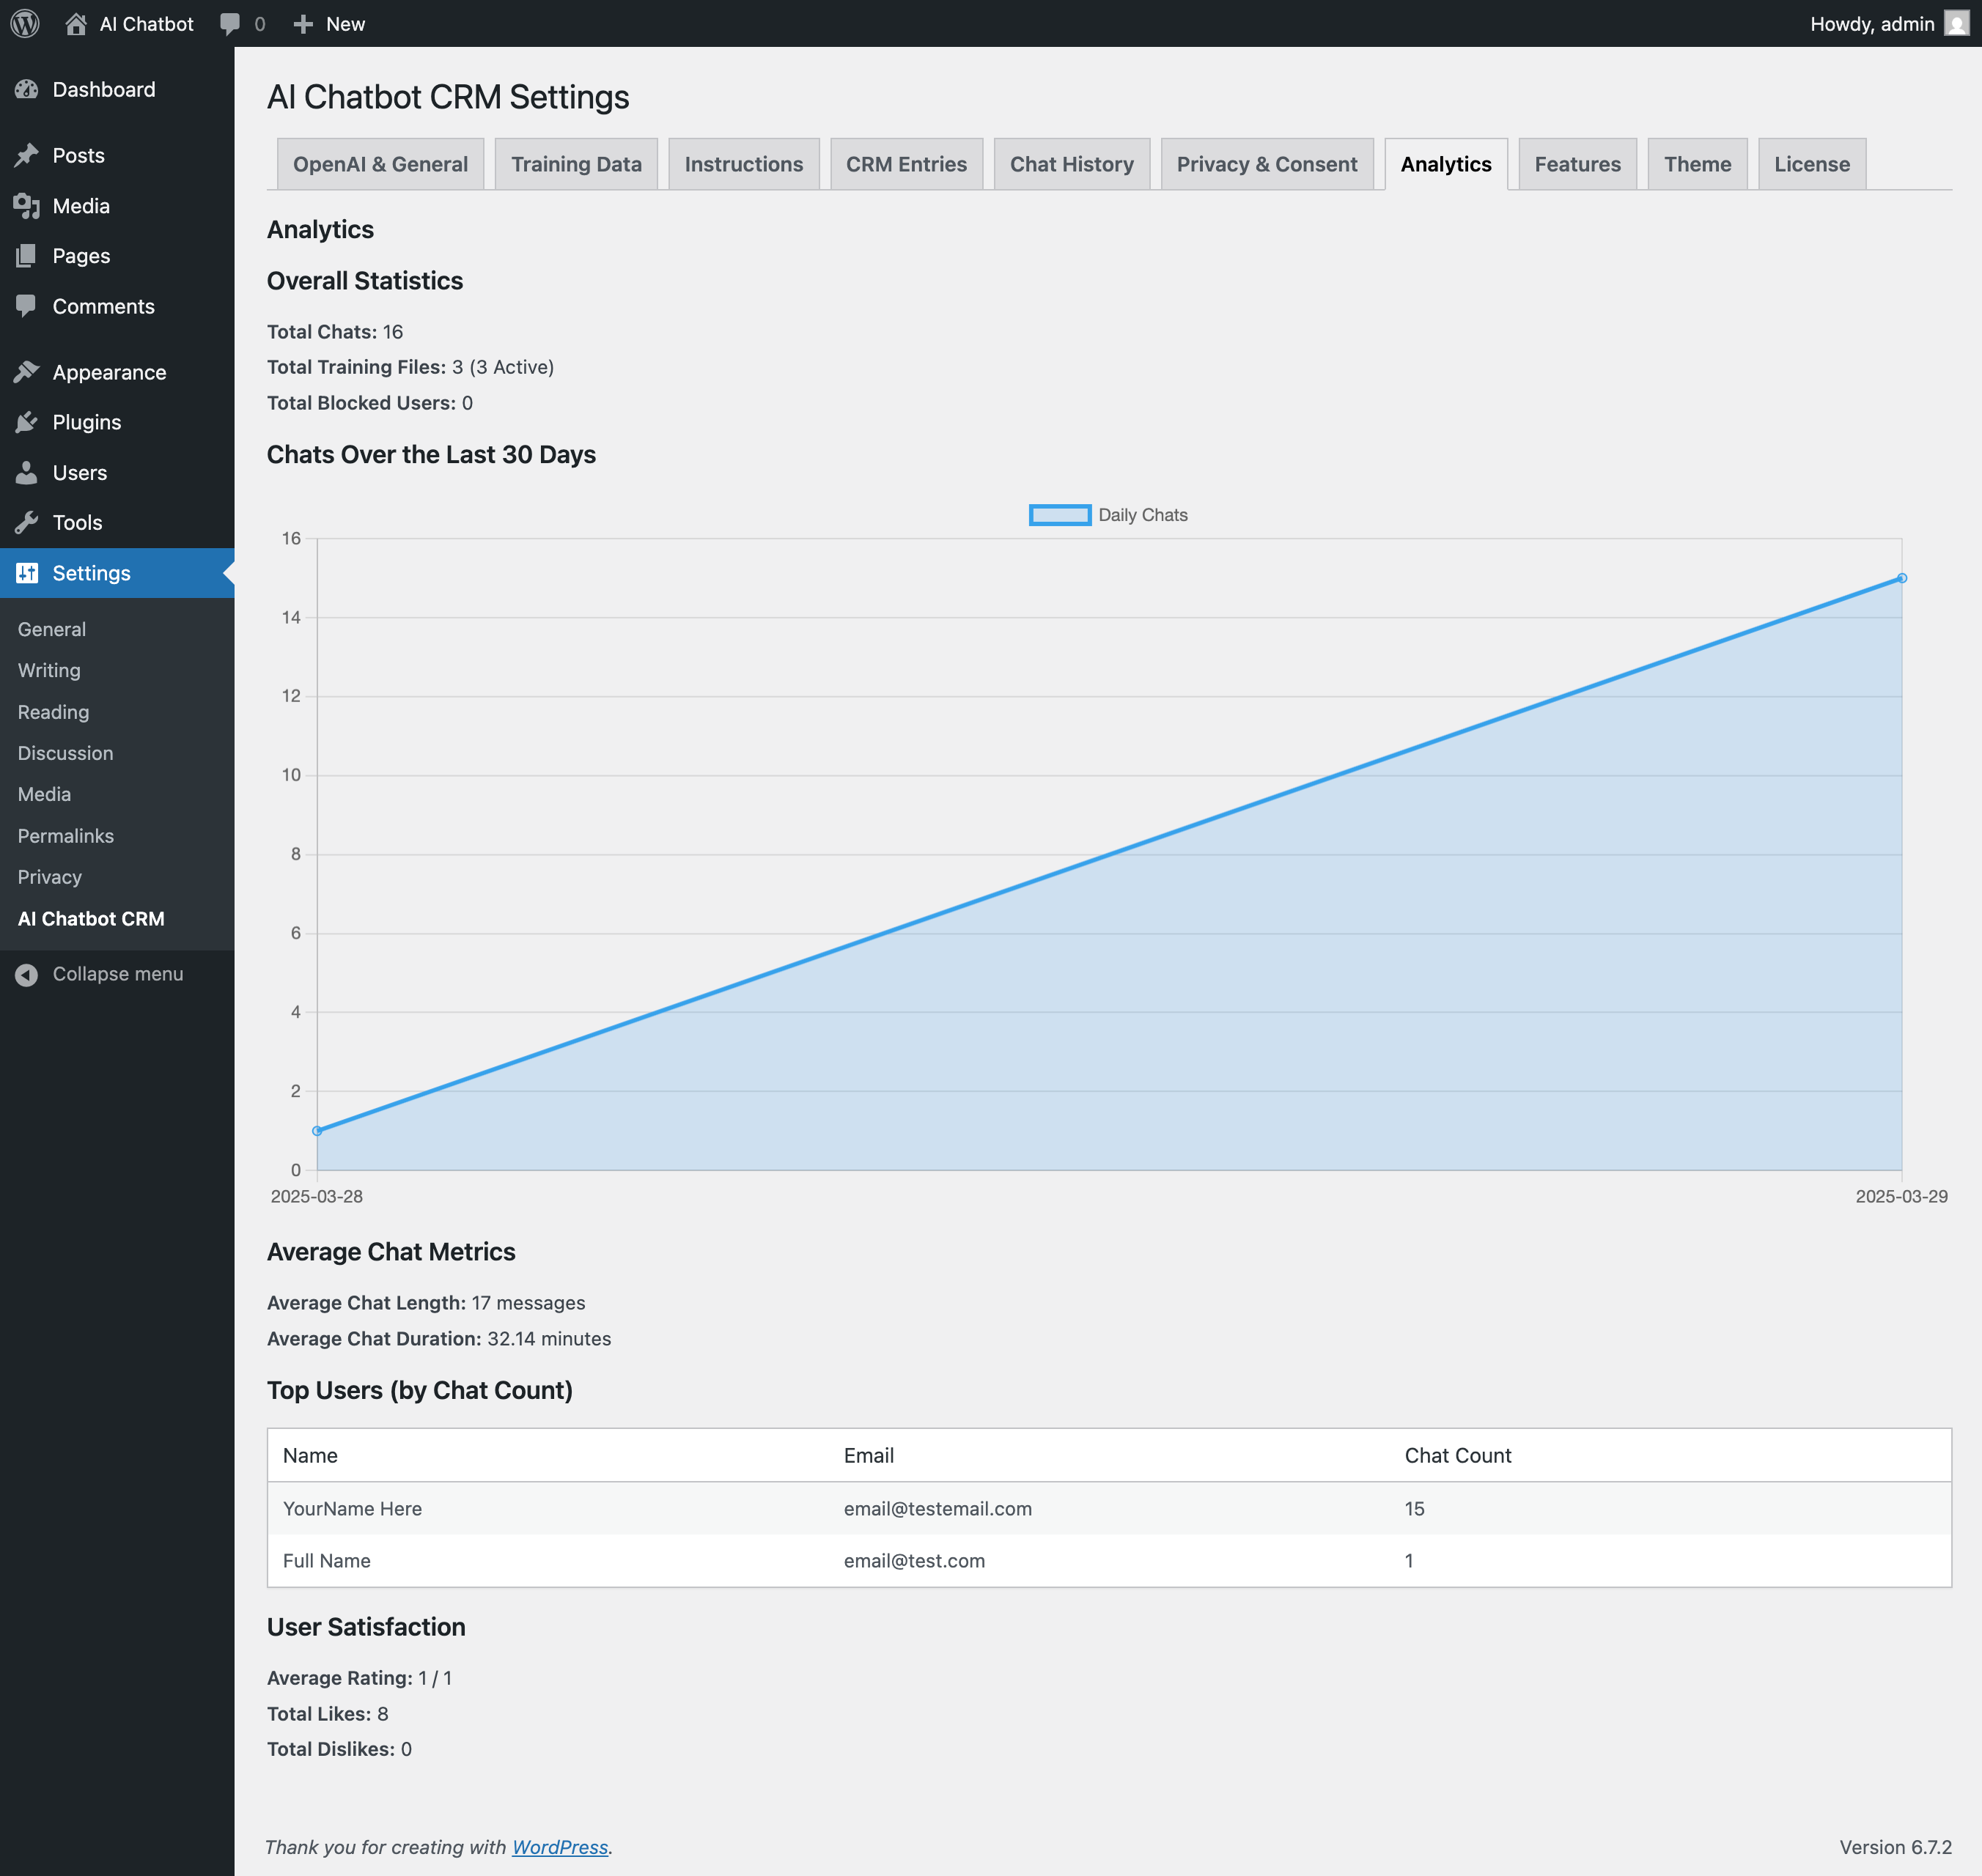
Analytics Tab Requires Active License
- Purpose: Get insights into WaviBot’s usage and performance.
- Displays: Total chat counts, active training files, blocked users, a chart of daily chats (last 30
days), average message count and duration per chat, a list of top users by chat volume, and user
satisfaction metrics (average rating, total likes/dislikes, if Continuous Learning is enabled).
7. Deploying WaviBot on Your Site
After configuration, choose how to make WaviBot visible to
your visitors:
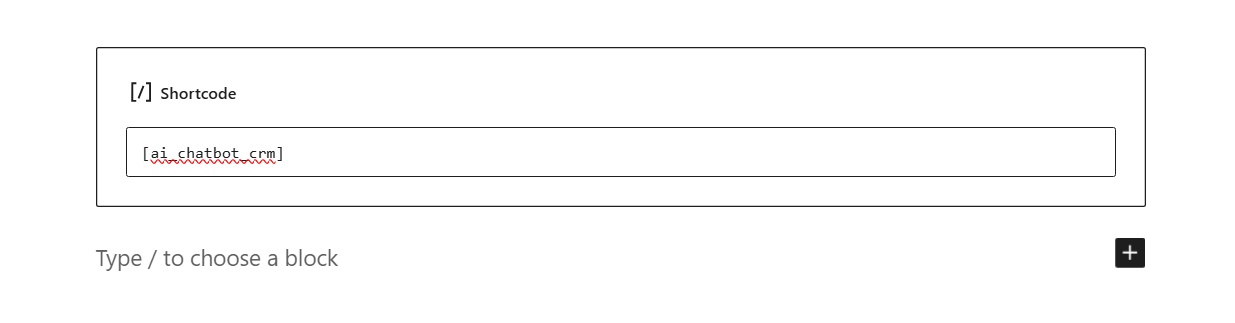
Using the Shortcode
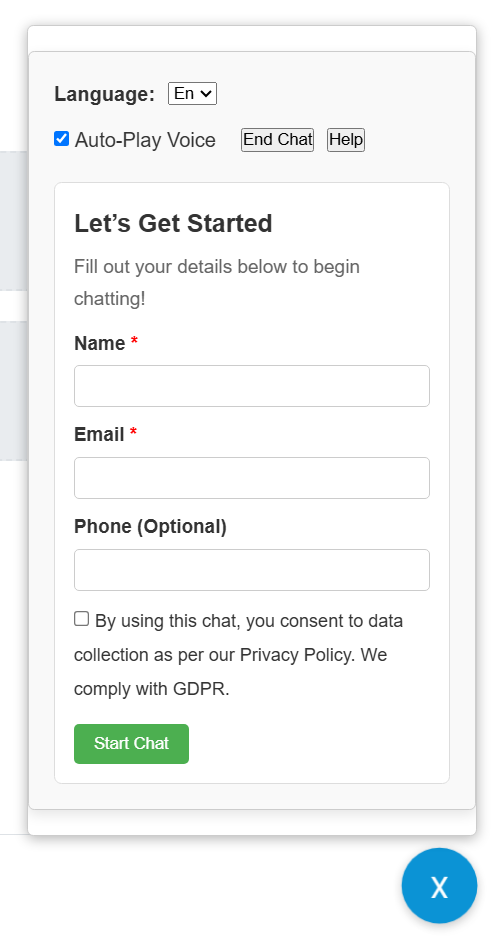
Let’s Get Started
Fill out your details below to begin chatting!
Let’s Get Started
Fill out your details below to begin chatting!
- Edit any Page, Post, or use a Text Widget.
- Paste the shortcode
Let’s Get Started
Fill out your details below to begin chatting!
chat interface embedded. - Save the Page/Post/Widget.
Using the Gutenberg Block (“WaviBot AI
Chatbot CRM”)
- Edit a Page or Post using the Block Editor.
- Click the ‘+’ icon to add a new block.
- Search for “WaviBot AI Chatbot CRM”.
- Click the block name to insert it into your layout.
Screenshot: Adding the WaviBot block in Gutenberg
Using the Floating Widget
- Go to Settings → AI Chatbot CRM → OpenAI & General.
- Find Chatbot Display Mode.
- Select
Floating Button(only the button) orBoth Shortcode & Floating
(allows both embedded and floating options). - Click Save Changes.
- A button will now appear (usually bottom-right) on your site frontend. Customize its look in the
Theme tab.

You can use the shortcode/block on specific pages (like
Contact or Support) and/or enable the floating widget for site-wide access.
8. Basic Troubleshooting
If you encounter issues, try these common checks:
- Plugin Not Working At All? → Check License! Go to
Settings → AI Chatbot CRM → License. Is the status ‘Active’? If not, activate it. - WaviBot Gives Errors / Doesn’t Respond? → Check OpenAI Key! Go to
Settings → ... → OpenAI & General. Is the key correct? Click
Test Connection. Check your OpenAI account for billing issues or quota limits. - Chat Interface Looks Wrong / Missing? → Check for theme/plugin conflicts by temporarily
switching to a default theme (like Twenty Twenty-Three) and deactivating other plugins one by one.
Ensure theChatbot Display Modeis set correctly. Check browser console (F12) for
JavaScript errors. - WaviBot’s Answers Are Incorrect/Generic? → Improve Training! Review
your uploaded files inTraining Data– is the information accurate and comprehensive?
Review yourInstructions– are they clear and specific? If using Vector Search, consider
clickingRe-Indexfor relevant files. - Voice Features Not Working? → Check browser permissions for microphone/speakers. Ensure
the correctVoice Output Methodis selected. Remember premium TTS options incur OpenAI
costs.
9. Getting Support
We want you to succeed with WaviBot AI Chatbot CRM!
- Documentation: Please review this guide thoroughly first, as many common questions are
answered here. Access it via [Link to Online Docs Here] or within the plugin download package. - Support Channel: If you need further assistance with bugs or setup covered by your
Envato purchase support, please contact us via [Your Official Support Method – e.g., the Envato item
comments section / our support portal at YourSupportURL.com]. - Support Scope: We provide support for WaviBot’s features and functionality. Support may
not cover extensive custom coding, conflicts with third-party items unrelated to WaviBot, or issues
directly related to your OpenAI account management/billing.
Thank you for using WaviBot AI Chatbot CRM! We hope it
greatly enhances your website.